Saturday, June 18, 2016

IP COMMAND SHEET SHEET


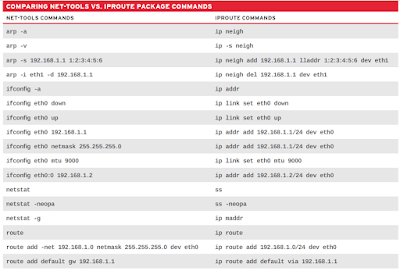
IP Commands :
– sudo ip link set eth1 up
– sudo ip addr add 192.168.x.y/24 dev eth1
– sudo ip link set eth2 up
– sudo ip addr add 192.168.y.x/24 dev eth2

– sudo ip addr flush dev eth1
– sudo ip addr flush dev eth2
– sudo brctl addbr br0
– sudo brctl addif br0 eth1 eth2
– sudo ip link set dev br0 up


#lsmod | grep 8021q

VCONFIG 
 ip link add link eno50 name eth0.400 type vlan id 400
 ip addr add 10.206.240.69/24 brd 10.206.240.255 dev eth0.400
 ip link set dev eth0.400 up

TCPDUMP VLAN TRACE 
tcpdump -i eth0 -Uw - | tcpdump -en -r - vlan 20
tcpdump -s0 -nnpi eth0 vlan 100

Saturday, June 11, 2016

Debian Package Creation


Debian Package Creation 

Packaging is Important : 
a. Consistency 
b. Policy 
c. Metadata 

Two Types of packages : 
a. Binary Packages 
b. Source Packages 

Debian Package Naming Convention
- The version of the debian Package 
- It should start with Version 1 - It gets incremented on every Release 
 - amd64 or x86_64 

Example: Package name
libguestfs_2.0-1_amd64.deb

Key Points :
•copyright also file needs to be edited. "License: Commercial and add HP License into it". 
• control file should have "Section: non-free" in there as we are commercial at not open source
  
Steps for the creation of debian package

Step1:     To make a debian package it is a must to have a version in the directory. ( that’s the reason I named as “1.0”)

Step2:     Execute #dh_make --createorig command    

               In order to create a package we need to have a debian directory structure. So to create a debian directory we need to execute the above command.

               After executing this command, automatically “debian” directory would be created inside your working directory.

Step3:     Get into debian directory. Here you can see all the configuration files which are helpful for making our module into .deb package.

 Following are the files need to be modified

              1. control
              2. changelog
              3. install
              4. postinst
              5. preinst 
              6. Postrm
              7. prerm

 Please go through these files and change the content accordingly.

Step4:    After changes are done then execute this command to create a .deb      

dpkg-buildpackage -us -uc

Step5:    It’s done you can see the .deb file under the parent directory of your project.

Example: Creation of debian package for libguestfs value add 

Step-1:  Rename the project folder name with the version number i.e., from libguestfs to libguestfs-2.0 

            mv libguestfs libguestfs-2.0

Step-2:  Execute the following command to create the debain folder structure

             cd libguestfs-2.0

libguestfs-2.0$ dh_make --createorig

Type of package: single binary, indep binary, multiple binary, library, kernel module, kernel patch?
 [s/i/m/l/k/n] s

Maintainer name : gyani pillala
Email-Address : ubuntu@unknown
Date : Thu, 03 Dec 2015 23:11:10 -0800
Package Name : libguestfs
Version : 2.0
License : blank
Type of Package : Single
Hit to confirm:
Currently there is no top level Makefile. This may require additional tuning.
Done. Please edit the files in the debian/ subdirectory now. You should also
check that the libguestfs Makefiles install into $DESTDIR and not in / .


Create/Edit the following files under debian directory

                    1. control

                          Edit the following sections in the file 

                               Section, Maintainer,  Depends, Description etc

                     2. changelog

                           Edit the version numbers and mail ids in the file

                     3. install      

                           Create the file and mention the src and destination paths of files in the file

                             eg:    

                                      test.txt   /opt/libguestfs

                              This means, the test.txt file will be copied to /opt/libguestfs directory while debian package installation

                     4. postinst

                           mv postinst.ex postinst

                           And write the post installation commands under configure section in the file

                     5. postrm       

                          mv postrm.ex postrm

                          And write the post removal commands under remove section

Execute the command to create debian package ie., .deb file

libguestfs-2.0$ sudo dpkg-buildpackage -us -uc
dpkg-buildpackage: source package libguestfs
dpkg-buildpackage: source version 2.0-1
dpkg-buildpackage: source distribution unstable
dpkg-buildpackage: source changed by gyani.pillala@xyz.com 
dpkg-buildpackage: host architecture amd64
 dpkg-source --before-build libguestfs-2.0
 debian/rules clean

....
 ....
 ...

 dpkg-deb: building package `libguestfs' in `../libguestfs_2.0-1_amd64.deb'.
 dpkg-genchanges >../libguestfs_2.0-1_amd64.changes
 dpkg-genchanges: including full source code in upload
 dpkg-source --after-build libguestfs-2.0
dpkg-buildpackage: full upload; Debian-native package (full source is included)

Debian package has been created under parent directory of libguestfs-2.0      

               libguestfs-2.0$ file ../libguestfs_2.0-1_amd64.deb

../libguestfs_2.0-1_amd64.deb: Debian binary package (format 2.0)


MORE INFO:  Depends on the Deb package Requirements, need to have below scripts 

The individual files are:

 preinst

This script executes before that package will be unpacked from its Debian archive (".deb") file. Many 'preinst' scripts stop services for packages which are being upgraded until their installation or upgrade is completed (following the successful execution of the 'postinst' script). 

postinst

This script typically completes any required configuration of the package. once package has been unpacked from its Debian archive (".deb") file. Often, 'postinst' scripts ask the user for input, and/or warn the user that if he accepts default values, he should remember to go back and re-configure that package as the situation warrants. Many 'postinst' scripts then execute any commands necessary to start or restart a service once a new package has been installed or upgraded.

prerm 

This script typically stops any daemons which are associated with a package. It is executed before the removal of files associated with the package. 

postrm 

This script typically modifies links or other files associated with Package, and/or removes files created by the package. postrm file needs to differ between and "apt-get remove" and a "apt-get purge" according to the Debian standard (where "remove" would leave the config files intact and "purge" would not)


HOW TO INCLUDE MAN PAGE IN DEBIAN PACKAGING

HOW TO INCLUDE MAN PAGE IN DEBIAN PACKAGING

WHAT IS A MAN PAGE?
Manual pages(man pages) are a descriptive help system that sometimes contains procedural help ("How do I..?") and sometimes the reason the command itself was created (the goal of the program). The command to format and view these manual pages is called man.
WHAT MAN PAGE CONTAINS?
Manual pages have a particular format. When you run the manual page for any program, you will normally find some very common sections. These sections are in bold and capital letters. They are, in order of appearance:
NAME
SYNOPSIS
DESCRIPTION
OPTIONS
BUGS
AUTHOR
SEE ALSO
These sections appear 90% of the time in any descent manual page. You will no doubt find other sections, though they are not the very common ones, and are added for extra information for the program.
NAME
This is the name of the program, followed by a short description of what it does or what the name stands for if it is in an acronym.
SYNOPSIS
Basically, this is the syntax used to run your program from the command line. An example would be like: 
wget [-h]

DESCRIPTION
This is where you describe what the program does. Because this is what the user is most likely going to look at first, it is important that this section is clear.
OPTIONS
If your program uses options, as in the above SYNOPSIS section, this is where you explain what each option does. For instance, what does [-d] do when it is given as an argument to program foo? is explained here.
BUGS
If there are any bugs in your program, or anything that does not work the way you want it to, put it here so the user knows.
AUTHOR
Your name followed by your email address. Your email address is important here people to give you bug reports so you can fix up your program.
SEE ALSO
If your program is related in a way to another program, specify the program's name here, followed by its section number. For instance, program foo is a text editor. You might want to make references to say, the vi text editor as: vi(1)

HOW IT WORKS?
When you run the command man foo, what actually happens is that man runs the groff command. Suffice it to say that groff is a text formatter that reads special macros in a file and outputs a formatted file, depending upon the macros used. Read the manual page for groff for a more informative explanation on how to use it. We will be using groff macros to create our manual page. These macros always start with a dot: "." followed by the macro name, and its parameters.
TITLE HEADER
We begin with the .TH macro. This macro expects at least five parameters in the order of:
.TH [name of program] [section number] [center footer] [left footer] [center header]
Now for the explanation:
[name of program]
This is obviously the name of your program. It will be on the left and right header of each page.
[section number]
Manual pages are kept in sections. If you check /usr/man you will find up to nine manual directories. These are the sections. Each section holds a specific type of manual page:
Section 1: user commands.
Section 2: system calls.
Section 3: subroutines.
Section 4: devices.
Section 5: file formats.
Section 6: games.
Section 7: miscellaneous.
Section 8: system administration.
Section n: new.
So if your manual page is for a game, then you will use section 6. If it is a system administration program, then you will use section 8. The section number will appear beside the name of the program in brackets: foo(1)
[center footer]
You can write anything that you like here and it will be displayed at the center of the footer of every page. Normally you put the date here.
[left footer]
You can write anything that you like here and it will be displayed at the left footer of every page. Normally you put the version number of your program here.
[center header]
You can write anything that you like here and it will be displayed at the center header of every page. Most manual pages have this omitted.
the manual pages are divided into sections. These sections are defined with the .SH macro. For instance, the first section is always NAME. .SH requires just one parameter.SH [section name]
.SH will always have [ section name] converted to bold lettering. Text written below .SH will be indented.

WHAT ARE THE FONT ATTRIBUTES?
The simplest ones are bold and italics. The macro for bold is .B and the macro for italics is .I. Depending on your system, italic fonts may appear as underlined text instead of actually italicized text. Normal font (no bold or italic), is called Roman.
use the following for best results
.B = bold
.BI = bold alternating italic
.BR = bold alternating Roman
.I = italic
.IB = italic alternating bold
.IR = italic alternating Roman
.RB = Roman alternating bold
.RI = Roman alternating italic
.SB = Small alternating with bold
.SM = Small (useful for acronyms)

PARAGRAPHING
Simple paragraphing is done with the .PP macro.
Another paragraphing macro to add to your collection is IP. This is great for the OPTIONS section. What it does is takes one parameter. Anything on the next line will be indented and tabbed to the right.

HOW TO INCLUDE MAN PAGE IN DEBIAN PACKAGING

Follow the step to include the man page as part of debian package.

1. Create a file (.manpages)  under debian directory
The file should contain the relative path of the man pages for the debian package

Example:

         Filename:   wget.manpages
         Contents: 

                                 debian/wget.1

debian/
├── changelog
├── compat
├── wget.1
├── wget.manpages
├── control
├── copyright
├── install
├── postinst
├── postrm
└── rules

When the debian package is installed, the man pages specified are also installed and can be run using the man command.

CONCLUSION
The manual page is supposed to be clear. Have it proof read to make sure there are no errors. Make sure the SYNOPSIS is correct.

Openstack Cinder backend Flow !


Cloud Controllers will try to get Authorization via HTTP protocol from Storage Subsystems. The cloud controllers will use the cinder.conf - The information  below is an Example of StoreVirtual VSA Storage backend information. 

[tripleo_lefthand]
hplefthand_password=*******
hplefthand_username=*******
hplefthand_iscsi_chap_enabled=True
hplefthand_api_url=https://*.*.*.*:8081/lhos
hplefthand_debug=False
volume_driver=cinder.volume.drivers.san.hp.hp_lefthand_iscsi.HPLeftHandISCSIDriver
hplefthand_clustername=
volume_backend_name=tripleo_lefthand

NOTE: From the cloud controllers - we should be able to ping the storage subsystem. What we mention in the Cinder.conf file. In fact many storage subsystems will allow as to LOGIN with username/Password what we mention in the cinder.conf file for validation. 
Example: To login to the VSA Storage Cluster 
#ssh username@ -p 16022 

Once the Controllers are authorized to the Storage backend, the cloud controllers will initialize the Driver. In this case it would be LEFTHAND Driver for VSA 

The cloud computes (KVM, ESXi , XEN) all will establish the iscsi initiator ID via iSCSI/CHAP protocols. All the computes will register to Storage Subsystem with their hostname. The hostname will hold the CHAP ID and the Computes will have the same CHAP ID in the file - /etc/iscsi/initiatorname.iscsi
InitiatorName=iqn.1994-05.com.redhat:e52c4e5689c

Below are the screen shots of the storage subsystem


Quick Verification of Cinder volumes in openstack 

Example: 1 
On the Cloud Controller:

#volume Attach and Detach 

nova volume-attach Virtual_Machine

nova volume-detach Virtual_Machine


On the Cloud Compute Node: 
#dmesg -c 
#iscsiadm -m node -o show

Example: 2
On the Cloud Controller: 
glance image-list
cinder create --image-id ID --display_name=Bootable_Image 10
nova --debug boot --flavor Number --nic net-id=ID --block-device-mapping=Cinder_ID vda=:::0 VM_Name

on the Cloud Compute Node:
#dmesg -c 
#iscsiadm -m node -o show

Monitor TCPDUMP iSCSI TRAFFIC on Compute Node
tcpdump -i interface  port 3260
tcpdump -i any "src net *.*.*.*/24"
tcpdump -i interface "src net *.*.*.*/24"

NOTE: Interface - Will be dedicate Storage Interface e.g. vlan211 and iSCSI-Target ( iSCSI Port - 3260)